Showing posts with label Breads. Show all posts

Friday, August 6, 2010

Savory Zucchini Bread & 2 Tomato "Use-Ups"


Last year when I was (as usual) trying to use up bushels of zucchini, I figured I'd try out a savory version.  L was thrilled because it has some of his favorite ingredients and he's not a fan of the typical sweet version.  This bread is chock-full of Mediterranean gems and goes great with tomatoes, another bumper crop of the summer.  I recommend it aside bowl of homemade tomato soup, topped with slow-roasted tomatoes and mozzarella, or slathered with tomato jam.


One thing I would change about this recipe is to scale it up 1 1/2 times because it results in sort of a short stubby loaf.  Next time I make it I will see how that goes and update this recipe with new amounts if it works out well.


Savory Zucchini Bread


2 eggs
1/4 cup olive oil
2 Tbsp balsamic vinegar
1 1/2 cups grated zucchini (I do this in my food processor)
3 or 4 cloves of garlic, chopped (Substituting 10 cloves of roasted garlic would be delicious)
2 roasted red peppers, chopped
1/2 cup kalamata olives, chopped
1/2 cup sundried tomatoes, chopped
1/4 cup parmiggiano reggiano, diced into tiny bits (This way you get little salty bites now and then)


1 1/2 cups all purpose flour
2 Tbsp Italian seasoning
1 tsp garlic powder
1/2 tsp ground black pepper
1/2 tsp salt
3/4 tsp baking soda
1/2 tsp baking powder

Preheat the oven to 350 F.  Grease a 9 x 5 x 3 loaf pan.

Beat together the eggs, oil and vinegar.  Add the zucchini, garlic, peppers, olives, tomatoes and cheese and stir to coat.  Sift flour, seasonings and leavenings into the bowl and stir until all ingredients are well combined.  Pour into the loaf pan and bake for 55-65 minutes.

Let cool in the pan for 10 minutes.  Then run a knife around the edge and invert to remove from the pan. Finish cooling on a wire rack before cutting.


Slow-Roasted Tomatoes


The trick to these tomatoes is roasting them as slowly as possible.  I put them in the oven in the afternoon and take them out the next morning when I wake up.  It's one of those recipes I feel guilty posting because it's barely a recipe.

10-12 Roma tomatoes or other low-moisture tomatoes, washed and split in half
olive oil
salt, pepper and any other desired seasonings

Toss tomatoes with olive oil to coat.  Arrange on a baking sheet, cut sides up.  Season as desired.

Set your oven as low as it will go (mine bottoms out at 170 F).  Stick your tomatoes in there and write yourself a little tomato love note so you don't forget about them.  Roasting time will depend on your oven but will be at least 12 hours.  I usually leave mine in for about 18 hours.  You know they're done when they've shriveled to about half their original size but are still moist inside.  These freeze very well and make an excellent pasta sauce when roughly chopped.


Cherry Tomato Jam

I've seen lots of recipes for this floating around cyberspace and finally had to try it myself.  It is the perfect mix of sweet and savory and goes particularly well with salty breads such as the zucchini bread above or any other cheese flavored bread.  It's also great as a topping for risotto cakes. It's not necessary to skin the tomatoes but it results in a better texture.  This recipe makes about 3 pint size jars.


2.5 lbs of cherry, pear or grape tomatoes (about 3 pints)

1 1/4 cups sugar (brown or white - both work well)
5 tsp balsamic vinegar
3 3/4 Tbsp lemon juice
2 Tbsp italian seasoning
2 tsp garlic powder
1/2 tsp salt
1/2 tsp freshly ground black pepper
pinch of red pepper flakes

Bring a quart of water to a boil and prepare a large bowl of ice water.  Slash the ends of each tomato quickly with a paring knife.  Plunge the tomatoes, a pint at a time, into the boiling water for about 30 seconds (you should see the skins start to curl up at your incision), then use a slotted spoon to transfer them to the ice bath.  Repeat for other pints.  At this point the skins should slide right off.  Discard the skins and transfer the "meat" to a large saucepan.  Add sugar, vinegar, lemon juice and seasonings and bring to a boil.  Reduce heat to low and simmer for 1 1/2 to 2 hours, or until thick and jammy.

Transfer to pint jars.  This will keep for about 3 weeks in the fridge or 6 months in the freezer (use plastic containers if you plan to freeze it).  It can also be canned in a boiling water canner.  For this method, make sure your canning jars are sterilized and place your lids in a pan of water just below a simmer to soften the adhesive.  Leave 1/2 inch of headspace before placing the lid and making the ring fingertip tight.  Boil enough water to cover the jars by at least one inch, use canning tongs to place jars in the rack and process for 15 minutes (longer at higher altitudes).  If you haven't canned before please don't rely on this explanation alone - visit the national food safety database or the Ball preserving website first and fully educate yourself on how to can safely.

Wednesday, August 4, 2010

Chocolate Zucchini Bread


This time of year everyone has extra zucchini threatening to bust out of the produce bin!  Although most of our zucchini gets marinated in Italian dressing and grilled, we just can't eat it all.  I've already put up 10 cans of zucchini pickles (I most post this some time - they're way better then the cucumber variety), and I have a bag of zucchini fritters in the freezer, so it's time to break out the loaf pan and bake up some zucchini bread.


My usual zucchini bread is a savory version, since L is not a fan of sweet stuff.  If I can advert any major disasters and manage to photograph it decently I'll be bringing that one to you later.  Once in a while, I like to mix it up a little and see the sweeter side.  I often find sweet zucchini bread to be too dry or too dense and I often get bored with the obligatory spices that seem to be overused in all baking: cinnamon, nutmeg and allspice.  Although I like to use these as showcase flavors on their own, I feel like they get lost in a generic "baked good" taste.  So instead of going the traditional route, why not use an ingredient that is at its best in in rich dense cakes, and pack it full of chocolate!  Sounds better already doesn't it?!  Then throw in some coffee to pump up the flavor and one unexpected spice to play a star role.  Moist and intensely chocolatey - now that's a sweet zucchini bread I can get into!'

Chocolate Zucchini Bread with Coffee and Cardamom


Cardamon is an acquired taste for some, so if it's not your thing I recommend substituting a tablespoon of spicy Saigon cinnamon instead.  A dash of cayenne with the cinnamon will make it a delectable Mexican chocolate cake.

2 large eggs
1/2 cup vegetable oil
1/2 cup sugar
1/2 cup light brown sugar
2 tsp vanilla extract
1 1/2 Tbsp instant espresso granules
1/2 tsp ground cardamom (optional) **Edit** This amount is appropriate if you freshly grind the cardamom - if not use 1 full tsp
1/2 tsp salt

1 cup all-purpose flour
1/2 cup really good quality cocoa powder (I like Scharffen-Berger)
1 tsp baking soda
1/4 tsp baking powder

1 1/2 cup shredded zucchini (summer squash also works well)
1 cup semisweet chocolate chunks
1/2 cup chopped macademia nuts (optional)

Preheat the oven to 350 F and grease a loaf pan.

Beat the eggs in the bowl of a stand mixer.  Add the oil, sugars, vanilla, espresso, cardamom and salt and mix well.  Sift in the dry ingredients and mix until just combined.  Toss in zucchini, chocolate and nuts and stir to combine.

Pour into the loaf pan and bake for 55-65 minutes, or until a toothpick inserted into the middle of the loaf comes out clean.

Cool in the pan for 10 minutes, then run a knife around the edge and invert to remove.  Let cool completely on a wire rack before slicing.

Monday, March 29, 2010

Recipe Review: No-Knead Apple Bread


Jim Lahey's no-knead breads have been the center of a lot of attention in recent years, and I'm convinced that just about everyone has tried one of his no-knead recipes. His basic recipe is my go-to loaf.  So when I was killing some time in a bookstore and his new book "My Bread" caught my eye, there was no way I could walk out without it.  It's a treasure trove of bread, pizza and sandwiches, so deciding what to make first was a struggle.  Luckily, some cider about to waste away at the back of the fridge made the decision for me.


It resulted in a crackily crusted beauty of a bread, with a crunchy snap at the surface and a soft but chewy interior speckled with tender chunks of apples.  I did notice that 475 was just too hot, resulting in a slight char on some of the edges.  Next time I'll reduce the heat to 450 and see how that goes.  I'm relaying this recipe by weight, since that's really to only way that proportions can remain the same from one cook to another.  If you enjoying baking and haven't yet invested the $20 for a scale I only have one question - why not?  No one measures the same way, so for good results - weigh it out!

This would make a good snack, breakfast or side for a nice pork roast.  It doesn't need any butter - it's beautiful on its own.  Any stale bread would make an excellent bread pudding.


No-Knead Apple Bread
inspired by and closely based upon Jim Lahey's recipe in "My Bread"

1 small apple (I used a pink lady), peeled, cored and chopped into small bits
65 g (~1 cup) of chopped dried apple slices
280 g (~2 cups & 2 Tbsp) bread flour
20 g (~ 2 Tbsp) whole wheat flour
4 g (3/4 tsp) salt
1 g (1/4 tsp) active dry yeast
1 g (1/4 tsp) cinnamon
250 g (1 cup) apple cider

In a medium bowl, stir all ingredients together with a wooden spoon.  The dough will be wet and sticky. Cover and let sit overnight (at least 12 hours).

Dust the dough's surface with some flour.  Using well-floured hands, form the dough into a ball by tucking the edges of the dough under the center.  Dust a tea towel with flour or wheat bran.  (If you like you can lay out an apple slice to crown the loaf.)  Gently transfer the dough to the towel, seam side down and wrap the towel around to cover it.  Allow to rise for one or two more hours.  The dough is ready when it's almost doubled in size and pressing your finger into the dough leaves an indentation that doesn't spring back.

About 30 minutes before the dough is done rising, put a large cast iron (or ceramic) dutch oven with its lid in the lower third of the oven and preheat it to 450 F.

When everything is preheated, use pot holders to remove the preheated pot from the oven and remove the lid.  Quickly and gently invert the dough from the towel into the pot, replace the cover and return to the oven for 45 minutes.

Remove the lid and continue to cook until the bread turns a chestnut brown color - no more then 10 minutes.  Remove from the oven and allow to cool until the bread stops "singing" - making crackling noises - about 20 minutes.

Sunday, March 28, 2010

Cinnamon Sugar Popovers


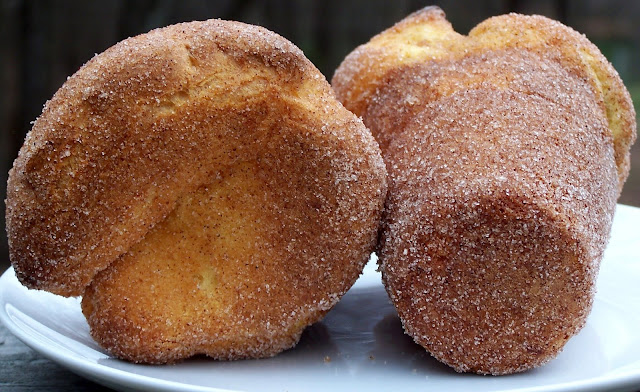
There are few things I love more than a popover.  Light and eggy - crunchy on the outside, airy and a little flakey like a fresh croissant in the middle.  These are perfect with soup, alongside a salad, to sop up the juice of a good roast, and just by themselves.  So when I saw this recipe for a sweet version, I was all over it.  I am of course incapable of baking anything without some almond extract, so that was one of my alterations along with a couple others.


These are completely addictive so beware.  It may or may not be true that in 3 hours, there is only one popover left - zipped up and hidden so that I don't have to admit to eating an entire batch singlehandedly.  They make a fantastic breakfast but no doubt would be lovely served almost like a profiterole - stuffed with some good ice cream.


Cinnamon Sugar Crusted Popovers
Makes 6 (in a popover tin) - 9 (in a muffin tin)

1 cup 2% milk
2 Tbsp melted unsalted butter
2 jumbo (or 3 large) eggs
1 tsp vanilla extract
1 tsp almond extract
1/2 tsp salt
1 1/2 Tbsp sugar
1 cup all-purpose flour

2 Tbsp melted butter
1 cup sugar
1 Tbsp Saigon cinnamon

Preheat oven to 400 F.  Grease a popover tin (or muffin tin).

Combine milk, butter, eggs, extracts, salt, sugar and flour in a blender.  Blend until well combined - about 10 seconds.

Fill each cup of the tin about 1/2 - 2/3 of the way full, dividing the batter evenly.  Bake for about 35 minutes or until golden brown.  Combine cinnamon and sugar in a container with a lid.

Let cool about 3 minutes in the pan, then remove to a wire rack.  As soon as they are cool enough to handle, brush one with butter then add to the cinnamon sugar container and shake to coat.  Repeat with remaining popovers.

These are best when still warm and crunchy, but can be stored in an airtight container for a day or two.  I think.  I've never actually had them last that long!

Sunday, February 7, 2010

Looking Forward to Leftovers...Part 2


OK - this is really pathetic - how is it that I took these pictures on October 25, Wrote this Nov 8th and am only now publishing it??! Well - at least this is great for leftovers year round. Whenever I make mashed potatoes, this is really the reason - I want to use the leftovers! P.S. - here's why I have time to post this (finally):


Every thanksgiving we make what my brother-in-law lovingly refers to as "heart-attack mashed potatoes." Since this holiday comes but once a year, these yukon golds are loaded up with roasted garlic, butter, cream, cheddar cheese, bacon, and scallions. Eat them too often and expect to see scary cholesterol levels at your next doctors visit. But boy are they good, and once a year fits most people's definitions of moderation.

I often find myself with leftover mashed potatoes, usually even more leftovers when it is not the holiday season. Since we are much bigger fans of the mashed potato the first time around, I love this recipe to use up the extras. Any flavors you have in your potatoes will work here, and this bread is just to die for.


Roasted Garlic Potato Rosemary Bread


Starter
2 1/2 cups unbleached bread flour
1/2 teaspoon rapid rise yeast
3/4 - 1 cup of room temp water

"Finishers"
1 head of garlic
olive oil

3 1/4 cups unbleached bread flour
1 1/2 tsp salt
1/2 tsp coarsely ground black pepper
1 tsp garlic powder
1 1/4 tsp rapid rise yeast
1 cup leftover mashed potatoes
1 Tbsp of roasted garlic olive oil from the previous step
3 Tbsp chopped fresh rosemary
3/4 cup - 1 cup room temp water

To make the starter: Combine ingredients in a large bowl and mix until combined. Start with 3/4 cup of water and add water if needed to form a slightly tacky dough. Knead in a stand mixer on medium-low speed for 4 minutes or by hand for 8 minutes. Put aside into a well oiled bowl, cover and keep on the counter for 24-48 hours.

To finish the bread:
Preheat an oven (or a toaster oven) to 300 degrees. Slice the top off a head of garlic, so that the cloves are just exposed. Drizzle with olive oil and place face down in a pyrex or ceramic baking dish. Drizzle the outside with olive oil. Roast until golden and fragrant, about an hour. Let cool, then squeeze out cloves and dispose of "garlic paper."

In the bowl of a stand mixer, stir together remaining bread flour, salt, pepper, yeast and garlic powder. Cut the starter into ten pieces and add them all separately, alternating with the mashed potatoes, oil, rosemary and 3/4 cups water. Mix on low speed for a minute (with the bread hook attachment). Add more water as needed until the dough comes together into a ball. Knead about 6 minutes on medium speed. At this point you should be able to take a small bit of dough and stretch it thin enough to see light through it without it ripping.

Flatten the dough into a large rectangle and spread garlic cloves over it. Gather it back into a ball, dust it with flour and knead for a minute by hand. Transfer to an oiled bowl, cover with plastic wrap and let rise 2 hours or until doubled in size.

Divide the dough into 2 equal pieces and shape into 2 round loaves. Let rise on parchment paper or silpat for an additional 1 to 2 hours.

Preheat the oven to 400 F. Brush the loaves with olive oil and transfer them (still on the parchment/silpat) to a sheet pan. Bake for 20 minutes, then rotate the pan and bake for another 15-25 minutes or until golden brown and a thermometer inserted in the middle reads at least 195 F. Cool for at least 30 minutes before serving.

Sunday, November 2, 2008

Better than You Know Who's Biscuits


There is a certain seafood restaurant empire named after a scarlet crustacean that serves up baskets of cheesy biscuits with every meal. They're a favorite of many, and I decided they couldn't be that hard to make at home. I was right, these are one of the simplest recipes, and sure to impress. I served them up next to some fancy fish and broccolini at a dinner party last week, and every time I bring one in to work people scrounge for a bite. Neither too casual or too standoffish, these should definitely find a place on your table.

Although you can certainly roll these out and cut them, I find they rise better as drop biscuits, plus I love the texture of those crispy, craggy corners.

Smoky Cheddar Scallion Drop Biscuits
Makes 24 (halves easily).


4 1/2 cups all purpose flour (preferably White Lily-not the self rising kind)
5 tsp baking powder
1 1/2 tsp baking soda
1 Tbsp sugar (for browning)
2 tsp hickory smoked salt (or regular salt)
2 tsp chile powder
1 tsp garlic powder
1 tsp smoked paprika
1 tsp ground black pepper
1 1/2 sticks of butter, cut into cubes
2-3 cups coarsely grated smoked cheddar
5 finely chopped scallions
1/2 cup finely chopped jalapenoes or two finely chopped chipotles in adobo(optional)
1 cup buttermilk (shake well before measuring)

Preheat oven to 450 degrees, with two racks dividing it into thirds. Line 2 cookie sheets with silpat or parchment paper.

Whisk together all dry ingredients. Add butter cubes and use a fork or pastry blender to cut them into the flour until the mixture resembles a coarse meal. Add remaining ingredients, stir until just combined. Do not over mix.

Use your hands to form large biscuits. Drop 12 rounds onto each cookie sheet.

Bake until golden (about 20 - 25 minutes), rotating pans halfway through.

Best served warm. These reheat easily. I make a lot because they freeze well and everyone always wants more. Feel free to halve the recipe.

Sunday, September 14, 2008

Ushering in Fall


Autumn is my hands down favorite season. I love everything about it, the chill in the air, the musty sweet smells, evenings by campfires snuggling up together with mugs of mulled cider. All of my favorite events fall between September and December, starting with L & I's anniversary (8 years on Weds, sadly all unmarried - oh well, someday!), then the steeplechasing race we look forward to each year, Halloween (although it's not my favorite fall holiday), apple picking, leaf gawking, my birthday in early November, a full house at Thanksgiving and to cap it all off my favorite holiday of all, Christmas. I can't tell you how sad I am on New Years, knowing that it will be 9 long months.


So, while other people are still reveling in summer's bounty of peaches, tomatoes and corn, I've moved on, hurrying into fall. These sweet rolls are the perfect example. I've told you before about my thoughts regarding cinnamon rolls (nice but boring, and L hates them), so this time they get a makeover with fall flavors. Pumpkin and spice lend moistness and flavor to a brioche dough (based on Peabody's recipe), which hugs a filling of pears, pecans and dulce de leche. Start making these the day before, then you can just pop them in the oven and you'll have an easy and delicious breakfast.


Pumpkin Spice, Pecan & Pear Sweet Rolls


2/3 recipe Pumpkin Spice Brioche Dough
1 cup dulce de leche
3 small , 2 medium or 1 large pear, cut into small chunks
1/2 cup toffee bits, such as Heath Bar
1 cup pecans, toasted and crumbled
pumpkin pie seasoning

1 1/2 cups powdered sugar
2 Tbsp Frangelico liquor
4 Tbsp water

Roll out dough into a large rectangle, no more than 1/2 inch thick. Arrange rectangle so that the longer sides are the top and bottom. Spread with dulce de leche. Top with pears, toffee bits and pecans. Sprinkle with spices.

Grease a 9 x 13 or other large baking vessel. Roll dough up like a jellyroll, from bottom to top. Use a sharp knife to slice the roll into 2 inch thick pieces (for smaller rolls, make your rectangle much longer on the top and bottom and cut thinner slices). Place each piece into the baking dish as you slice it, with it's best looking end up.

Wrap loosely with plastic wrap and refrigerate overnight to proof or let sit at room temperature one hour to rise. The following picture is what they should look like after proofing:


Preheat oven to 375. Brush with egg wash if desired. Bake for 30-35 minutes, or until golden and cooked through.

Mix together powdered sugar, liquor and water to make a glaze. Pour it down over the rolls. If desired, top with a sprinkling of toffee bits.


Pumpkin Spice Brioche Dough


1/4 cup warm water
1 packet active dry yeast
15 oz canned pumpkin
1/3 cup brown sugar
1/4 cup dry nonfat milk powder
1 cup bread flour

6 cups bread flour
1 Tbsp pumkin pie seasoning
5 eggs
1 stick unsalted butter, softened

Combine water and yeast in the bowl of a stand mixer. Stir and let sit until foamy. Stir in pumpkin, sugar, milk powder, and 1 cup bread flour. Let sit until it's puffed in size, about 40 minutes.

Add remaining bread flour and spices and stir with the dough hook on low speed. Add eggs, one at a time, until all are incorporated. Turn speed up to medium low and add butter, 1 Tbsp at a time. Dough should become shiny and slightly moist. Knead for about 5 minutes in the machine. Turn out into an oiled bowl and let rest until doubled in size, about 2 hours.

If making sweet rolls, proceed from this point. With the remaining dough, roll it out into a rectangle as long as a loaf pan, brush with butter and top with a mixture of either brown sugar and pumpkin pie spice or chopped sage, fried pancetta and parmesan. Roll up bread and put into a greased loaf pan. Let rise 1 hour, then bake for 10 minutes in a 400 degree oven. Reduce heat to 350 for remainder of baking time, about 20 minutes.

Wednesday, September 10, 2008

Slow Cooker BBQ Pork For A Crowd


Yes, it's another pulled pork recipe. Only supersized. And on uber-cheesy bread. So, in case you didn't get enough with this Latin / Asian take or my Char Sui Bao, here's a more traditional, All-American version.

I'm sure I've told you all about MOLDOW (Munchies On the Last Day Of the Week), but just in case I'll give a refresher course. MOLDOW is a lovely tradition at the high school where I teach, where everyone in the math and science departments take turns to bring in some home cooked food on Fridays (or sometimes wednesdays or thursdays) for breakfast and lunch. A former department chair started up this tradition over ten years ago, when he won a free turkey and made everyone turkey sandwiches for lunch. It's been gaining in popularity ever since and is a weekly ritual that has, quote " gotten way outta hand." [Sidenote: I may be the reason it's gotten way out of hand. I'm not sure I'm upset about that.]

Pulled Pork is perfect for MOLDOW. It's easy to make ahead, actually tastes better after a couple days, and reheats quickly in a crockpot. Not to mention it feeds a huge number of people for relatively little cash. Please feel free to scale down this recipe. It is sized to feed 30+ people. This is fantastic on the cheesy bread recipe below, but also awesome with some sour cream, scallions and tortilla chips.


Slow Cooker Pulled Pork

15 lbs. pork shoulder (about 20 lbs if bone-in)
hickory smoked salt
chile powder
brown sugar

1 tsp butter
1 large sweet onion, grated
1 1/2 chipotle peppers in adobo, chopped fine
2/3 cup dry vermouth
1/3 cup ketchup
3 Tbsp tomato paste
1 Tbsp pomegranate molasses
2 Tbsp dark molasses
1 Tbsp orange blossom honey
1/4 cup red wine vinegar
1/4 cup worchestershire sauce
1 Tbsp liquid smoke
2/3 cup orange pinapple concentrate
1 Tbsp dijion mustard
1 tsp chile powder
1 1/2 Tbsp garlic powder
1 Tbsp cinnamon chipotle rub
1 Tbsp pork rub (McCormick)
1 tsp crushed oregano
2 tsp ground cumin
1 tsp ground black pepper
1 1/2 cup water

Rub pork with brown sugar, chile powder and hickory smoked salt. Grill over high heat until caramelized and lightly charred on the outside. Let rest while you make the sauce. Melt butter in a medium saucepan over medium high heat. Saute onion and chipotle until soft. Add remaining sauce ingredients (I know - it's a lot, but it's good!). Simmer 10 minutes. Remove from heat and let cool to lukewarm.

Pour sauce down over pork. At this point you can cook or refrigerate overnight. Braise in a slow cooker set to low for 10 whopping hours (low and slow, baby!).

Remove pork to a bowl and shred with a fork, discarding pieces of fat. This should be super easy, as the pork has a tendency to almost melt by this point. Bring liquid to a boil, and reduce by at least half, or until slightly thickened. Blend with a boat motor (stick blender) until emulsified. Toss pork back into sauce.

Serve immediately or refrigerate overnight. Reheat in a crockpot on high heat for one and a half hours. Keep warm until serving (mine has a lovely setting for this too).


Cheesy Bread for Pulled Pork Sammies
Makes 4 loaves - perfect for the full recipe of pork above. Halves easily.

Leave out the chiles if you're not a fan of the heat (or cooking for people who aren't). You can use white cheddar, but the yellow lends beautiful color to this loaf.

2 2/3 cup warm water
2 packets active dry yeast
4 eggs
4 Tbsp rendered bacon fat (yeah, I know - but it's for 4 loaves of bread people!)
4 Tbsp unsalted butter
4 tsp hickory smoked sea salt
4 tsp sugar
2 tsp smoked paprika
1 Tbsp ground black pepper
1 Tbsp garlic powder
2 tsp chile powder
1 chipotle in adobo, minced (optional)
1 cup shredded extra sharp cheddar
11 - 12 cups flour

4 cups crumbled sharp cheddar
smoked paprika
freshly ground black pepper
chile powder
garlic powder
hickory smoked salt
1 cup shredded sharp cheddar

Combine water and yeast in the bowl of a stand mixer and let sit 5 minutes, or until foamy. Whisk in eggs, bacon fat, butter, salt, sugar, spices and cheddar. With the mixer's dough hook, slowly knead in flour in small additions until a soft, not sticky dough forms. Knead by hand on a lightly floured surface for 4 minutes, then place in an extra large oiled bowl covered with plastic wrap. Let rise one hour, or until doubled.


Spray four 8 x 4 inch loaf pans with nonstick spray. Separate dough into 4 pieces. Roll each out into an oval on a floured surface. Top each with cheese crumbles and sprinkle with spices. Roll each up like a jellyroll, tuck ends under and place seam side down in a prepared pan. Spray with nonstick spray and let rise one hour.


Preheat oven to 375. Place pans on a large baking sheet. Bake for 35 minutes. They should be golden. Top with shredded cheese. Bake another 5-10 minutes, or until cheese is bubbly. Cool in pans 15 minutes, then unmold onto wire racks to cool.

Sunday, September 7, 2008

"Hot Dogs" with a Thai Twist


I've been really awful. You see, Sweet Paul gave me my first blog awards about a month ago and I have yet to announce it or pass them on! It just keeps slipping my mind! Plus, I knew it needed a great recipe to do it justice! So, Paul, I do apologize and they do mean so much to me! I am passing each on to a blog that is well-deserving of the honor!

The I love your blog award goes to Gwendolyn of Patent and the Pantry! I love your beautiful food photos and retro style!


The Brilliante Weblog 2008 gets passed to Gattina of Kitchen Unplugged! This international woman of mystery is truely brilliant, and her vibrant colors and great compositions never fail to inspire!


I love both of these blogs, so do check them out! And now for the recipe...

Hot dogs are great off the grill, snug in a soft bun with a little coleslaw or sauerkraut. But they're just not that special. This takes your normal dog to another level. It starts with a fragrant Thai Sub Roll, topped with a layer of warm, spicy, sweet and nutty slaw and topped off with charred gourmet Thai chicken sausages. Serve alongside grilled zucchini and summer squash that's been marinated in Thai dressing and you've got all new inspiration for your Sunday cookout!

Thai Sausage Rolls Dressed with Warm Peanut Slaw


1/4 cup rice vinegar
2 Tbsp peanut butter
1 tsp toasted sesame oil
2 Tbsp lime juice
1 tsp soy sauce
1 Tbsp sriracha
3 Tbsp sugar
1/2 large head Napa cabbage, finely shredded
1/4 cup chopped peanuts

4 Thai chicken sausages
4 Thai Sub Rolls

Combine vinegar, peanut butter, sesame oil, lime juice, soy sauce, sriracha and sugar in a large nonstick skillet and bring to a simmer over medium heat until peanut butter has "melted" into sauce. Add cabbage and cover. Cook, stirring occasionally for 15-20 minutes, or until cabbage has softened. Toss with peanuts before serving.

Grill chicken sausages over high heat until well charred. Slice buns down the middle. Pile in the Kraut (slaw?) and top with a sausage. Serve immediately.

Thai Sub Rolls


3 cups flour
1 1/2 tsp salt
1 Tbsp sugar
1 tsp ground ginger
1 packet instant yeast (also labeled Rapid Rise)
1 cup thai stock (Wegmans makes a great one - alternatively blend 1 cup chicken stock with 1 tsp Tom Yum paste)
1 Tbsp grated lemongrass
2 tsp sriracha

1 egg, beaten
2 Tbsp black sesame seeds


In the bowl of a stand mixer fitted with a dough hook, blend together dry ingredients. With the mixer on low, slowly add in stock, sriracha and lemongrass. Kneed the dough for 5 minutes on low speed. The dough should be soft and smooth. Form into a ball and transfer to an oiled bowl. Wrap loosely with oiled plastic wrap. Let rise one hour.

Separate into 4 to 6 pieces, depending on the size you like your rolls. I like to match their length to the length of the sausages I'm using. Sprinkle part of your counter (or parchment paper if you prefer) with cornmeal. Form the dough into an oblong roll and transfer to prepared surface. Let rise another hour. With 1/2 an hour to go, preheat oven to 450 F with a pizza stone in the middle.

Brush the rolls with egg wash, sprinkle with sesame seeds and place on the preheated pizza stone. Mist the oven walls with water. Bake for 5 minutes, reduce heat to 400, and mist again. Let bake until golden brown, 10-15 minutes. Let cool on a wire rack.

Related Posts with Thumbnails