Showing posts with label Breakfast. Show all posts

Friday, August 6, 2010

Savory Zucchini Bread & 2 Tomato "Use-Ups"


Last year when I was (as usual) trying to use up bushels of zucchini, I figured I'd try out a savory version.  L was thrilled because it has some of his favorite ingredients and he's not a fan of the typical sweet version.  This bread is chock-full of Mediterranean gems and goes great with tomatoes, another bumper crop of the summer.  I recommend it aside bowl of homemade tomato soup, topped with slow-roasted tomatoes and mozzarella, or slathered with tomato jam.


One thing I would change about this recipe is to scale it up 1 1/2 times because it results in sort of a short stubby loaf.  Next time I make it I will see how that goes and update this recipe with new amounts if it works out well.


Savory Zucchini Bread


2 eggs
1/4 cup olive oil
2 Tbsp balsamic vinegar
1 1/2 cups grated zucchini (I do this in my food processor)
3 or 4 cloves of garlic, chopped (Substituting 10 cloves of roasted garlic would be delicious)
2 roasted red peppers, chopped
1/2 cup kalamata olives, chopped
1/2 cup sundried tomatoes, chopped
1/4 cup parmiggiano reggiano, diced into tiny bits (This way you get little salty bites now and then)


1 1/2 cups all purpose flour
2 Tbsp Italian seasoning
1 tsp garlic powder
1/2 tsp ground black pepper
1/2 tsp salt
3/4 tsp baking soda
1/2 tsp baking powder

Preheat the oven to 350 F.  Grease a 9 x 5 x 3 loaf pan.

Beat together the eggs, oil and vinegar.  Add the zucchini, garlic, peppers, olives, tomatoes and cheese and stir to coat.  Sift flour, seasonings and leavenings into the bowl and stir until all ingredients are well combined.  Pour into the loaf pan and bake for 55-65 minutes.

Let cool in the pan for 10 minutes.  Then run a knife around the edge and invert to remove from the pan. Finish cooling on a wire rack before cutting.


Slow-Roasted Tomatoes


The trick to these tomatoes is roasting them as slowly as possible.  I put them in the oven in the afternoon and take them out the next morning when I wake up.  It's one of those recipes I feel guilty posting because it's barely a recipe.

10-12 Roma tomatoes or other low-moisture tomatoes, washed and split in half
olive oil
salt, pepper and any other desired seasonings

Toss tomatoes with olive oil to coat.  Arrange on a baking sheet, cut sides up.  Season as desired.

Set your oven as low as it will go (mine bottoms out at 170 F).  Stick your tomatoes in there and write yourself a little tomato love note so you don't forget about them.  Roasting time will depend on your oven but will be at least 12 hours.  I usually leave mine in for about 18 hours.  You know they're done when they've shriveled to about half their original size but are still moist inside.  These freeze very well and make an excellent pasta sauce when roughly chopped.


Cherry Tomato Jam

I've seen lots of recipes for this floating around cyberspace and finally had to try it myself.  It is the perfect mix of sweet and savory and goes particularly well with salty breads such as the zucchini bread above or any other cheese flavored bread.  It's also great as a topping for risotto cakes. It's not necessary to skin the tomatoes but it results in a better texture.  This recipe makes about 3 pint size jars.


2.5 lbs of cherry, pear or grape tomatoes (about 3 pints)

1 1/4 cups sugar (brown or white - both work well)
5 tsp balsamic vinegar
3 3/4 Tbsp lemon juice
2 Tbsp italian seasoning
2 tsp garlic powder
1/2 tsp salt
1/2 tsp freshly ground black pepper
pinch of red pepper flakes

Bring a quart of water to a boil and prepare a large bowl of ice water.  Slash the ends of each tomato quickly with a paring knife.  Plunge the tomatoes, a pint at a time, into the boiling water for about 30 seconds (you should see the skins start to curl up at your incision), then use a slotted spoon to transfer them to the ice bath.  Repeat for other pints.  At this point the skins should slide right off.  Discard the skins and transfer the "meat" to a large saucepan.  Add sugar, vinegar, lemon juice and seasonings and bring to a boil.  Reduce heat to low and simmer for 1 1/2 to 2 hours, or until thick and jammy.

Transfer to pint jars.  This will keep for about 3 weeks in the fridge or 6 months in the freezer (use plastic containers if you plan to freeze it).  It can also be canned in a boiling water canner.  For this method, make sure your canning jars are sterilized and place your lids in a pan of water just below a simmer to soften the adhesive.  Leave 1/2 inch of headspace before placing the lid and making the ring fingertip tight.  Boil enough water to cover the jars by at least one inch, use canning tongs to place jars in the rack and process for 15 minutes (longer at higher altitudes).  If you haven't canned before please don't rely on this explanation alone - visit the national food safety database or the Ball preserving website first and fully educate yourself on how to can safely.

Wednesday, August 4, 2010

Chocolate Zucchini Bread


This time of year everyone has extra zucchini threatening to bust out of the produce bin!  Although most of our zucchini gets marinated in Italian dressing and grilled, we just can't eat it all.  I've already put up 10 cans of zucchini pickles (I most post this some time - they're way better then the cucumber variety), and I have a bag of zucchini fritters in the freezer, so it's time to break out the loaf pan and bake up some zucchini bread.


My usual zucchini bread is a savory version, since L is not a fan of sweet stuff.  If I can advert any major disasters and manage to photograph it decently I'll be bringing that one to you later.  Once in a while, I like to mix it up a little and see the sweeter side.  I often find sweet zucchini bread to be too dry or too dense and I often get bored with the obligatory spices that seem to be overused in all baking: cinnamon, nutmeg and allspice.  Although I like to use these as showcase flavors on their own, I feel like they get lost in a generic "baked good" taste.  So instead of going the traditional route, why not use an ingredient that is at its best in in rich dense cakes, and pack it full of chocolate!  Sounds better already doesn't it?!  Then throw in some coffee to pump up the flavor and one unexpected spice to play a star role.  Moist and intensely chocolatey - now that's a sweet zucchini bread I can get into!'

Chocolate Zucchini Bread with Coffee and Cardamom


Cardamon is an acquired taste for some, so if it's not your thing I recommend substituting a tablespoon of spicy Saigon cinnamon instead.  A dash of cayenne with the cinnamon will make it a delectable Mexican chocolate cake.

2 large eggs
1/2 cup vegetable oil
1/2 cup sugar
1/2 cup light brown sugar
2 tsp vanilla extract
1 1/2 Tbsp instant espresso granules
1/2 tsp ground cardamom (optional) **Edit** This amount is appropriate if you freshly grind the cardamom - if not use 1 full tsp
1/2 tsp salt

1 cup all-purpose flour
1/2 cup really good quality cocoa powder (I like Scharffen-Berger)
1 tsp baking soda
1/4 tsp baking powder

1 1/2 cup shredded zucchini (summer squash also works well)
1 cup semisweet chocolate chunks
1/2 cup chopped macademia nuts (optional)

Preheat the oven to 350 F and grease a loaf pan.

Beat the eggs in the bowl of a stand mixer.  Add the oil, sugars, vanilla, espresso, cardamom and salt and mix well.  Sift in the dry ingredients and mix until just combined.  Toss in zucchini, chocolate and nuts and stir to combine.

Pour into the loaf pan and bake for 55-65 minutes, or until a toothpick inserted into the middle of the loaf comes out clean.

Cool in the pan for 10 minutes, then run a knife around the edge and invert to remove.  Let cool completely on a wire rack before slicing.

Sunday, March 28, 2010

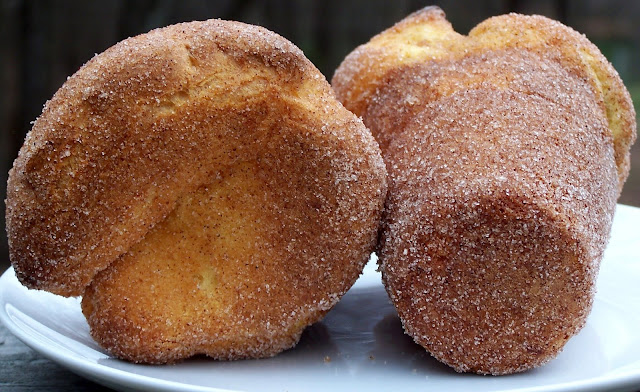
Cinnamon Sugar Popovers


There are few things I love more than a popover.  Light and eggy - crunchy on the outside, airy and a little flakey like a fresh croissant in the middle.  These are perfect with soup, alongside a salad, to sop up the juice of a good roast, and just by themselves.  So when I saw this recipe for a sweet version, I was all over it.  I am of course incapable of baking anything without some almond extract, so that was one of my alterations along with a couple others.


These are completely addictive so beware.  It may or may not be true that in 3 hours, there is only one popover left - zipped up and hidden so that I don't have to admit to eating an entire batch singlehandedly.  They make a fantastic breakfast but no doubt would be lovely served almost like a profiterole - stuffed with some good ice cream.


Cinnamon Sugar Crusted Popovers
Makes 6 (in a popover tin) - 9 (in a muffin tin)

1 cup 2% milk
2 Tbsp melted unsalted butter
2 jumbo (or 3 large) eggs
1 tsp vanilla extract
1 tsp almond extract
1/2 tsp salt
1 1/2 Tbsp sugar
1 cup all-purpose flour

2 Tbsp melted butter
1 cup sugar
1 Tbsp Saigon cinnamon

Preheat oven to 400 F.  Grease a popover tin (or muffin tin).

Combine milk, butter, eggs, extracts, salt, sugar and flour in a blender.  Blend until well combined - about 10 seconds.

Fill each cup of the tin about 1/2 - 2/3 of the way full, dividing the batter evenly.  Bake for about 35 minutes or until golden brown.  Combine cinnamon and sugar in a container with a lid.

Let cool about 3 minutes in the pan, then remove to a wire rack.  As soon as they are cool enough to handle, brush one with butter then add to the cinnamon sugar container and shake to coat.  Repeat with remaining popovers.

These are best when still warm and crunchy, but can be stored in an airtight container for a day or two.  I think.  I've never actually had them last that long!

Saturday, March 13, 2010

Dessert For Breakfast - Tiramisu Pancakes


Tiramisu winds up on the table at every holiday gathering with family.  Everyone from my sweet-tooth-lacking husband to my doesn't-like-to-try-anything-new grandmother loves it, and who couldn't?  What's not to love - rum and coffee saturated spongy cookie layers dressed up with a lightly sweetened froth of marscapone and whipped cream.

Our favorite treat turned up again on Valentine's Day.  Of course, I never look at the recipe before I go shopping (that would be too organized and just not my style) - so I've had an extra container of marscapone ever since.  It was nearing its expiration date and not wanting it to languish in the fridge, I was searching for a worthy use.  Apparently I was not alone in this quest, because the Ivory Hut had just posted these pancakes as a solution to the same quandary set forth by Jaden of the Steamy Kitchen.

Obviously this was a temptation I could not resist.  And believe me, I'm so glad I didn't.  Here's my version - buffed up with more marscapone and a hint of the rum that I find so essential to a good tiramisu.

Tiramisu Pancakes
Makes about 18 pancakes.

Marscapone Cream
8 oz marscapone cheese at room temperature
1 1/4 cup whipping cream
2 Tbsp dark rum - use the best stuff - I like Meyer's dark
2 Tbsp grade B (dark amber) maple syrup
1 Tbsp espresso powder

Combine all ingredients in the bowl of a stand mixer and beat on high speed until medium peaks form.  Put in the fridge to chill until the pancakes are ready.

Mocha Pancakes
1 1/2 cups 2% milk
1/2 cup light sour cream
2 Tbsp espresso powder
4 Tbsp melted and cooled unsalted butter
3 large eggs
1 tsp vanilla extract
1 tsp chocolate extract (optional - you can substitute another of vanilla or some rum)

2 cups unbleached all-purpose flour
3 Tbsp sugar
2 1/2 Tbsp best-quality cocoa powder
2 tsp baking powder
1/2 tsp baking soda
1/4 tsp salt

In a large bowl, whisk together milk, sour cream and espresso powder until smooth and slightly frothy.  Whisk in butter, eggs and extracts and beat until well combined.

Place a large mesh strainer/sifter over the mixing bowl.  To this add all of the dry ingredients.  Sift the dry ingredients into the wet ingredients.  Mix these together with a whisk for about 6 stirs, then switch to a rubber spatula, stirring only until there are no more large lumps of flour.  The batter will still be slightly lumpy.

Let the batter sit as you preheat a griddle or nonstick pan with a little butter in it.  I like to start a griddle off on medium-high heat, gradually reducing the heat to medium for the first batch and down to medium-low once that gets too hot.

Ladle about 1/4 cup of batter for each pancake onto the preheated griddle.  Cook until the top is a mosaic of bubbles and the underside is golden brown, then flip and cook another couple of minutes.  Serve immediately or keep warm on a rack set into a sheet pan in a very low oven (the lowest yours will go).

To serve, layer with marscapone cream and dust with confectioners sugar, cocoa powder or chocolate shavings.

Saturday, November 21, 2009

Looking Forward to Leftovers...Part I


With all of the work that goes into making every Thanksgiving perfect, you deserve to be reaping the benefits for the following week. Yet all too often, leftovers just turn into turkey sandwiches and other monotonous duplicate meals, and after a few days you're sick and tired of reheat and reeat the same old thing, and you're ordering pizza while the leftovers languish and spoil in the back of the fridge. In the spirit of frugalness, in a waste not want not economy, we need to bring these leftovers to an unexpected place, where they will be transformed from the lovely but boring feast day foods into unrecognizable reincarnations. I hope that this series, which I will post throughout the week, will inspire you to think outside the leftover box, and enjoy your post-Thanksgiving time care free.

These waffles make use of leftover sweet potatoes or squash (both work well). If your leftover sweet potatoes aren't already mashed, just puree them first in a blender or food processor. Don't bother picking out nuts or marshmallows or whatever you like to put in, just puree it all together. Spices, even odd ones, taste great in this recipe so no worries about that either.

Since I have a full house (literally - no walking room) of guests from afar for most Thanksgivings, breakfast the day after is just as important to plan for as the big meal itself. It's a final send off for my guests and it needs to be filling enough that they can get through the 6-8 hour drive with minimal stops, but not so heavy that they want to fall asleep at the wheel. These waffles, drizzled with dark amber maple syrup and served with a pumpkin spice latte, fit the bill perfectly.


Apple, Pecan & Sweet Potato Waffles

3 large eggs
3/4 cup milk
1/4 cup melted butter
1 cup leftover mashed or pureed sweet potatoes or squash
1 tsp vanilla or pecan extract
3 Tbsp sugar (I like brown or maple sugar for these)
2 cups whole wheat pastry flour
1 1/2 tsp backing powder
1/2 tsp salt
1/2 cup toasted pecan pieces
1 small apple, peeled, cored and diced into small chunks

Preheat a waffle iron.

In a large bowl, beat together eggs, milk, melted butter, sweet potatoes and extract until well blended. Sift in flour, sugar, salt and baking powder. Stir until mostly mixed. Add pecans and apples and stir until well combined. Add more milk if the batter looks too thick (should be a normal consistency for waffles, a little thicker than pancake batter).

Prepare waffles according to the directions that came with your waffle iron. Serve with maple syrup and either hot cider or pumpkin spice lattes.

Saturday, June 20, 2009

Hidden Treasures


I am a big fan of lemon poppyseed muffins. But only if they are really moist and really lemony. These deliver, with a moist crumb, crisp buttery crust and surprise pocket of raspberry goodness. Modified from Baking: from my home to yours with Dorie Greenspan, and baked in a Nordic Ware flowered pan, these are really mini-cakes. They'd make an excellent addition to your next brunch or bake sale.


Lemon Poppyseed Muffins with Raspberry Jam Hidden Treasures


zest and juice of one lemon
3/4 cup low-fat yogurt
2 large eggs
1 tsp vanilla extract
1 tsp lemon extract
1 stick melted butter, cooled
2 cups all purpose flour
2/3 cup sugar
2 tsp baking powder
1/4 tsp baking soda
1/4 tsp salt
2 Tbsp poppy seeds
6 Tbsp seedless raspberry jam

Preheat the oven to 400 degrees, with the oven rack in the middle. Grease a nonstick mini-cake pan (makes 6) or a muffin pan (makes 12).

Combine zest, juice, yogurt, eggs, extracts and butter in a large mixing bowl. Whisk until well blended. Add flour, sugar, baking powder and soda and salt and stir until dry ingredients are moistened (don't worry about lumps). Stir in poppy seeds until they're well incorporated. Use a disher (aka an ice cream scoop) to fill each cup halfway with batter. Follow with a Tbsp of jam (only 1 1/2 tsp if making 12 muffins), then the other half of the batter (filling each cup about 3/4 of the way).


Bake 18-20 minutes for muffins, 22-26 for mini-cakes, or until tops are golden and a toothpick inserted just to the side of the jam comes out clean. Cool on wire racks and devour.

Sunday, April 12, 2009

In Search of the Egg


When I was a child Easter was a magical holiday. My father was the master of the Easter Egg Hunt. Now, I'm not talking close your eyes and i'll hide some eggs, then you scuttle around trying to find them before your bratty little brother. I'm talking personalized clues for both of us, made weeks in advance, hidden in candy filled eggs. We had to decipher the clue in order to find the next one, and hours later eventually find the treasure trove in a basket somewhere we never would have looked. The hunt began in an Easter egg suspended by ribbon just above our pillows, so when we woke up it we couldn't miss it.

To this day my dad insists that it was just a ploy to buy him a couple more hours of sleep. And although God knows a man who commuted 2 hours each way every weekday and traveled several times a month needed all the sleep he can get, I know it was a lousy excuse. He loved how happy it made us, how we felt like pirates searching for lost treasure and seeing our beaming faces all day long, straight through church service and on through dinner, even with the dreaded brussel sprouts. I think Easter was the one holiday my father actually enjoyed. His parents divorced over the winter holidays and so his memories are not so pleasant. But on Easter he would arise to our cheers and looting of our baskets and make a plate of deviled eggs and leisurely read the paper before we got dressed up and prepared for the day's festivities.

Now that we've all grown up and gone, I hope he still lingers in the window seat with his morning coffee and his thoughts drift back to days gone by, as mine have this morning. I hope it brings a smile to his face. Here's to you dad, and here's what I would cook for Easter.

BRUNCH


Bacon Cheddar Scallion Quiche
Quiche is the perfect brunch dish. Here's why: 1 - you can make it with almost anything, any leftover meats and veggies you can scrounge up. 2 - It reheats beautifully (not to mention it's also good cold), making it the perfect make ahead dish. This was always a favorite of my dad's, although on easter, it would have been deviled eggs, probably with the hard boiled ones we dyed the day before. The ricotta may sound out of place, but it lends a delightful creaminess to the quiche, especially when left in small chunks. If this one doesn't suit your mood, try Cajun quiche instead.


1 store bought refrigerated pie crust
8 oz shredded sharp 2% cheddar cheese
5 slices bacon, crisp cooked
1/4 cup ham chunks (optional)
5 small scallions, white and green parts sliced thin
1/2 cup fat free ricotta
8 eggs
1/4 cup 1% milk
salt and pepper to taste

Preheat the oven to 375 F, with a rack on the lowest shelf. Roll out pie dough and press into a greased 10 inch tart pan. Spread half the cheddar over the bottom of the crust. Sprinkle on bits of the bacon, ham and scallion. Dollop the ricotta in about a tablespoon at a time. Top with remaining cheddar. Beat the eggs with the milk until well combined, then pour over the fillings. Sprinkle the top with salt and pepper.

Bake on the bottom rack until crust and top is slightly golden and filling is set, about 45 minutes.

DINNER


Root Beer Baked Glazed Ham over Carrots
I can't believe that a glazed ham has not yet graced these pages, since it's one of my standybys, especially for large gatherings. However, upon making it I can see why, it's not very photogenic. It is darn tasty though. Buy a ham that actually looks like it came off of a pig, with the bone in, and not one of those pressed monstrosities. I prefer the shank end, and try to make sure it doesn't have water added if you can. Do not bother with spiral sliced - they dry out easily and it's really not that hard to slice a ham.

1 small bag baby carrots
10-15 pound half ham, bone in
cloves
1 1/2 cups root beer
1 1/2 Tbsp whole grain mustard
1 Tbsp vinegar from a jar of hot pickled peppers (or white vinegar)
1 Tbsp maple syrup
2 Tbsp bitter orange marmelade (British if possible)
1 tsp Worcestershire sauce
1/2 tsp liquid smoke (optional)
1 tsp soy sauce
1 cinnamon stick
1 bay leaf
1 tsp chile powder
1 tsp smoked paprika
1 tsp black pepper

Preheat oven to 325 F.

In a 13 x 9 glass baking dish, line the bottom with a layer of carrots. Trim the ham of any hard rind and place flat side down on top of carrots. Use a clean utility knife open to the second click (you can use a regular knife, but be really careful about the depth of the cut) to cut a diamond pattern into the ham. It should cut through the fat without cutting much of the meat. Stud the corners of the diamonds with cloves. Pour 1 cup of root beer into the dish and bake on the bottom rack for 1 hour and 15 minutes, basting every 15 minutes.


Meanwhile, make the glaze by combining the remaining ingredients in a small saucepan. Bring to a boil and reduce liquids to a thick syrupy consistency over medium heat. Remove cinnamon stick and bay leaf before using.

After the first round of baking, remove the ham from the oven, insert an oven safe thermometer - I like the probe kind that has a digital reader outside of the oven - and brush on the glaze (you won't use it all right away). Return to the oven and bake, brushing with glaze every 15 minutes, until internal temperature reaches 140 degrees F. Remove from oven and let sit 10 minutes before slicing. Serve any leftover glaze on the side for guests to brush on individual slices if they choose.

Serve with the carrots (which take on a fabulous flavor from the pan juices) and corn bake.

Saturday, January 31, 2009

A Dieter's Dilemma


Like most brides-to-be, the thought of myself in pictures that I'd be looking at for the rest of my life sent a chill up my spine. I want to lose some of those extra pounds, but I've had such a miserable time on diets of old. I always found myself sacrificing home-cooked for prepackaged, if only because then I didn't have to spend tedious hours calculating how many calories I consumed, I could just look at the label. And I was always sabotaged by desperate cravings for my favorite sweets or breakfast foods. It would go something like this.

Saturday 8am.
Woke up. First thought: "I want pancakes!"
Looked up nutritional information on favorite pancake recipe. "Damn" And that's without syrup!
Ate an apple.

Saturday 9am.
"I want pancakes!"
Scoured all of my cookbooks and the internet for a low-calorie pancake recipe. Found nothing. "Damn"
Ate a cup of sugar-free, fat-free (taste free) yogurt.

Saturday 12pm.
"I still want pancakes"
Contemplated working out 2 extra hours to accommodate said pancakes. Decided there was no time for that. "Damn"
Ate a salad. Stuck my tongue out at the salad because it wasn't pancakes.

Saturday 5pm.
"I REALLY want pancakes"
Broke down and made myself fattening, maple syrup drenched pancakes cooked in lots of butter. Felt good while enjoying them. Felt fat and guilty afterwards. "Damn!"


Now, this time I was determined it will be different. I will not sacrifice time in the kitchen. I will not sacrifice my favorite foods. I will eat pancakes dammit! And I will lose weight. So here's my oh-so-yummy, crispy, creamy, sweet and buttery yet diet-friendly pancake recipe. Four - yes FOUR generously-sized hot cakes and 1/2 of the syrupy fruity goodness clocks in at just about 400 calories! That means if you have awesome willpower (which I don't), then you could presumably get by on 2 pancakes and keep your breakfast to 200 calories. But I wouldn't know anything about that, nor do I want to. I'm loading my plate with goodies and still smiling afterwards!

Four Berry Diet-Friendly Pancakes
Makes 8 pancakes and a syrupy berry compote topping


1/2 cup fat free cottage cheese
1/2 cup low-fat buttermilk
1 Tbsp melted butter
1/4 cup liquid egg substitute
1 tsp vanilla
zest of an orange (or lemon would be yummy too)
1/3 cup splenda or equal (or 1/4 cup stevia - which is all natural) - if you use sugar here it will be more calories, but still not bad
2/3 cup Trader Joe's Multigrain Pancake Mix (or any whole-grain mix - or make your own, but don't forget baking powder and soda)
1/4 tsp freshly grated nutmeg
2 egg whites, beaten into soft peaks
butter-flavored nonstick cooking spray

2 Tbsp Trader Joe's reduced sugar raspberry preserves
heaping 1/2 cup blueberries
heaping 1/2 cup blackberries
4 large strawberries, cut into pieces
1 Tbsp splenda, equal or sugar (or 1/2 Tbsp stevia)

In a large mixing bowl, whisk together cheese, buttermilk, egg substitute, vanilla and zest. When it is well combined, stir in dry ingredients, then fold in egg whites.

Spray a pre-heated pan with cooking spray and return to medium heat. Ladle in batter, cooking 3 pancakes at a time. Let cook until lots of bubbles appear at the surface and underside is golden, then flip and let continue to cook until golden on both sides. Repeat with additional batter.

Meanwhile, combine preserves, berries and splenda in a small saucepan. Cook over medium heat, stirring occasionally until berries are slightly softer and a nice syrup has formed.


Serve pancakes hot off the griddle for best texture. They should be light and fluffy, crispy on the outside and slightly creamy inside (from the cheese). Top 4 pancakes with 1/2 of the berries and syrup for a delicious treat of a breakfast that won't break your calorie bank or land you in the gym for hours every day for the rest of the week. Then tell yourself how good you are for making sacrifices. Then laugh.


P.S. You will notice there are only 3 shown in a serving here. That's just due to my inability to resist eating one right off the griddle without accompaniment before I take pictures. Like I said - no willpower!

Saturday, November 1, 2008

Ciderhouse Rules


Some of my best fall memories revolve around the apple. When I was young, my mother worked at the historic Slater Mill in Pawtucket, Rhode Island. Each fall they had an evening craft show and tours of the old mill. All of the rough hewn pine beams and leaded-glass flooding the room with twilight created great ambiance, but what really permeates my memories is the smell of mulled cider, sipping a cup with folk music dancing in my ears as I rambled under, over and around the antique gears and looms.

Fast forward to eighth grade, when a passion for poetry had taken hold, and a writing retreat to Maine with childhood friends and cherished teachers. A football game in crisp air, then pulling ingredients from coolers and packing up dinner to take to a bonfire on the beach, shared with a thermos of cider under a ceiling of glitter. I never knew stars until that night.

And all of a sudden I'm a freshmen in college, awkward and lonely, stealing away to the neighborhood cafe for a steaming cup to help me plow through chemistry. Dashing home for weekends of apple picking, homemade caramel apples, apple sauce, apple pies...

Four years later, visiting my best friend in New Hampshire, the realization that this man had lapped me for most important person, but trading cider donuts and bushel bags none the less.


Apple cider has been one of the most central beverages in my life, and I don't even want to guess my lifetime consumption. I know that right now it averages about a gallon a week September through March. Although I don't think you can beat ladling out warm mugs of spiced nectar, cider donuts and apple crisp come close. In celebration of all things apple, I hope these recipes warm your body and your heart.

Cider Donuts (cake type) modified from Peabody's recipe


2/3 cup maple sugar
1/4 cup butter, softened
1/3 cup maple syrup
1 Tbsp dark rum
1 tsp vanilla extract
2 large eggs
1 cup apple cider, reduced to 1/4 cup over high heat
1/3 cup buttermilk
3 3/4 - 4 cups all purpose flour
2 tsp baking powder
1 tsp baking soda
1 tsp freshly grated nutmeg
1/2 tsp allspice
1/2 tsp pumpkin pie spice
1/4 tsp cardamom
1/2 tsp salt
vegetable oil for frying

2 cups confectioners sugar
1/4 cup apple cider

Cream butter together with maple sugar. Add maple syrup, rum and vanilla and mix well. Beat in eggs, one at a time. Add in buttermilk and reduced cider.

Sift in all dry ingredients, starting with 3 1/2 cups of flour. Stir to combine. If dough is too wet, add more flour (you need to be able to roll it out without it being sticky. Turn out on a floured countertop and pat to an even thickness (about 1/2 inch). Use a juice glass of the desired diameter to cut out donuts. Use a small cookie cutter of your choice to cut the holes in the middle (or a shot glass works well).

Fill a deep pan with oil until it's about 3 inches deep. Heat oil to 375 degrees F. Fry 3-4 donuts at a time, flipping when first side becomes amber in color, about 3 minutes. Use a slotted spoon to remove to a cooling rack over paper towels. Repeat with remaining donuts and donut holes. Let cool.

Meanwhile, make the glaze by whisking together confectioners sugar and cider. Use a chopstick through the middle of the donut to dunk each one in glaze. Return to cooling rack to dry.


This makes about 16 donuts. I recommend you only make these for a crowd, because you've gotta eat them the same day.


Gluten-free Hazelnut Apple Crisp


6-7 large macoun apples
2 tsp lemon juice
zest of a lemon
1 Tbsp Chinese five spice powder
1 tsp freshly ground cardamom
1 tsp ground ginger
1/2 tsp cinnamon
1/2 tsp nutmeg
1/2 tsp salt
2 Tbsp cornstarch

1/2 cup packed dark brown sugar
2/3 cup hazelnut meal
1 1/2 cups hazelnuts, toasted, skins removed and chopped coarsely
1 Tbsp pumpkin pie spice
1/2 tsp salt
1 stick of butter, melted

Peel the apples and slice about 1/4 inch thick. Toss with lemon juice. Add zest, spices and cornstarch and toss to combine. Empty into a greased 13 x 9 pyrex baking dish.


Combine topping ingredients in a small bowl and mix with fingers to combine. Sprinkle over apples and press down lightly.

Bake in a preheated 375 degree oven for about 30 minutes, or until topping has crisped and apples are bubbly but not yet completely soft. Enjoy warm with a dash of maple syrup, over oatmeal for breakfast, or with a scoop of vanilla ice cream for dessert.

Tuesday, September 30, 2008

Pizza For Breakfast?


Of course. Especially when it's a socially acceptable breakfast pizza. What can I say, sometimes I need something spicy in the morning!


Mexican Breakfast Pizza


1 large jalapeƱo herb tortilla
2 pickled serrano chiles, minced
1/4 cup tomato, diced
1/8 cup onion, diced
1 small avocado, skinned and pitted, diced
1 cup shredded mexican cheese
chile powder, cumin, garlic powder, salt and pepper for sprinkling

2 medium eggs, scrambled in butter
2 Tbsp packed cilantro leaves

Preheat oven to 400 F. Top tortilla with chiles, tomato, onion and avocado. Smother with cheese. Sprinkle with seasonings. Bake until cheese is melted and tortilla is crispy. Top with egg and cilantro. Cut into wedges and serve with a fork and knife.

Related Posts with Thumbnails